Главная » Как реализовать движение в разных игровых жанрах в Unity
Как реализовать движение в разных игровых жанрах в Unity
В этом очень «подвижном» уроке вы узнаете, как реализовать движение в разных игровых жанрах на движке Unity — как в 2D, так и в 3D.
Версия: C# 7.3, Unity 2019.3, Unity
Люди склонны ожидать определенные виды движений в определенных играх. Если вы играете в платформер, то вы ожидаете, что сможете бегать и прыгать персонажем. Если играете в клон «Diablo» , то ожидаете движение от указателя мыши и нажатия на кнопку мыши, чтобы перемещать игровых персонажей. Поэтому, если вы разрабатываете игру, неплохо было бы узнать об этих правилах движения… даже если это просто для того, чтобы ваша умопомрачительная игра могла их нарушить!
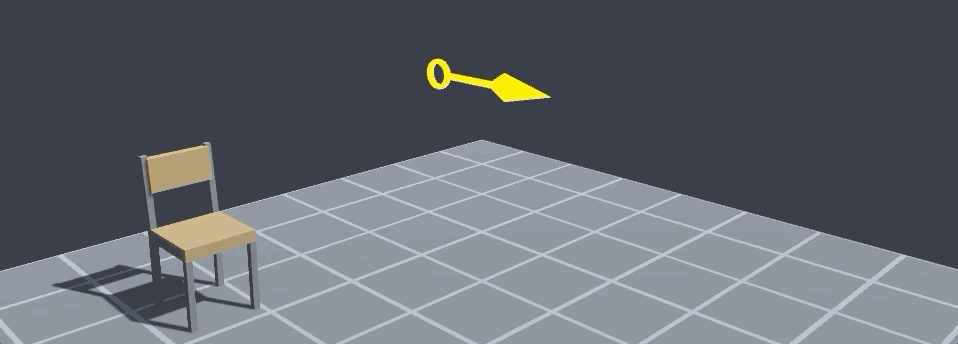
В данном уроке вы узнаете, как реализовать в Юнити четыре типа движения в разных игровых жанрах. Вы создадите простую игру с одной предысторией с двумя причудливыми персонажами, Катто и Ратто. Посмотрите, как они оживают в четырех различных контекстах:
- 2D-платформер
- 2D-игра с видом сверху
- 3D-игра, в которой применяется движение мышью
- 3D-игра с движением танка
Примечание. В этом уроке предполагается, что у вас есть базовые знания Unity и небольшой навык написания кода. Если вам нужно изучить основы, то почитайте «Начало работы с Unity» и «Введение в создание скриптов в Unity».
Также для этого урока необходим установленный редактор Unity версии 2019.1.3 или выше.
- Приступая к работе
- Различные типы движений в играх
- Движение в 2D против 3D
- Понимание трансформации игровых объектов
- Реализация движения в двумерной игре-платформере
- Настройка игровой сцены
- Добавление движения
- Настройка движения
- Реализация Animator Controller
- Написание скрипта движения для 2D-платформера
- Перемещение Катто вправо и влево
- Даем Катто способность прыгать
- Завершение движения
- Добавление условий к движению
- Отражение спрайта Катто
- Отражение спрайта Катто в соответствии с его движениями
- Кодирование 2D-движения с видом сверху
- Подключение элементов
- Написание 2D скрипта движения с видом сверху
- Нажатие мышью в 3D для вращения и перемещения
- Подключение элементов
- Добавление NavMesh Agent
- Написание скрипта для поворота и перемещения
- 3D движение танка
- Подключение элементов
- Написание скрипта движения танка
- Поворачивание Катто
- Перемещение Катто
- Куда двигаться дальше?
- Please wait.
- We are checking your browser. pechenek.net
- Why do I have to complete a CAPTCHA?
- What can I do to prevent this in the future?
- Game Dev Beginner
- How to Rotate in Unity (complete beginner’s guide)
- How to rotate an object in Unity
- Quaternions vs Euler Angles in Unity
- How to Rotate an object in Unity using the Rotate function
- Rotate vs Rotation in Unity
- Local rotation vs world rotation
- So, which one should you use?
- How to rotate an object around a point in Unity
- How to move the pivot point of a 3d object
- How to use Rotate Around in Unity
- How to define an axis of rotation in Unity
- How to rotate a vector in Unity
- How to rotate the camera around an object in Unity
- How to rotate the camera around an object without using Rotate Around
- How to rotate an object towards another
- How to use Look At
- How to use Look Rotation
- How to slowly rotate towards another object
- How to use Rotate Towards
- How to rotate an object over time (Lerp & Slerp)
- The difference between Lerp and Slerp for Rotation
- How to Rotate a Rigidbody with the mouse
- How to use the Add Torque function
- How to Rotate objects in 2D
- How to rotate a Rigidbody in 2D
- Now it’s your turn
- Get Game Development Tips, Straight to Your inbox
- My favourite time-saving Unity assets
- Rewired (the best input management system)
- DOTween Pro (should be built into Unity)
- Easy Save (there’s no reason not to use it)
- Comments
Приступая к работе
Скачайте проект, используя кнопку «Скачать материалы урока», которая находится в начале страницы, затем распакуйте файлы и откройте проект в Unity. Проверьте структуру папок в окне Project:

В уроке используется нисходящий подход. Каждая подпапка содержит все, что нужно для начала работы в каждом игровом жанре:
- Модели
- Префабы
- Сцены
- Скрипты
- Текстуры
Теперь, когда вы ознакомились с материалами проекта, подумайте о типах движений в играх, которые знаете и любите.
Различные типы движений в играх
Хотя есть различия между игровыми жанрами и типами движений, которые они используют, эти два понятия настолько тесно связаны, что люди часто их путают. Это не означает, что у вас не может быть игры в стиле «Resident Evil» , где персонаж может летать, например, но помните, что ограниченное движение — это часть того, что делает подобные игры пугающими.
Как и все в искусстве, вы должны изучить основы, прежде, чем создавать свой собственный стиль. Жанры дают вам отправную точку для выбора типов движений, которые используются в играх.
Движение в 2D против 3D
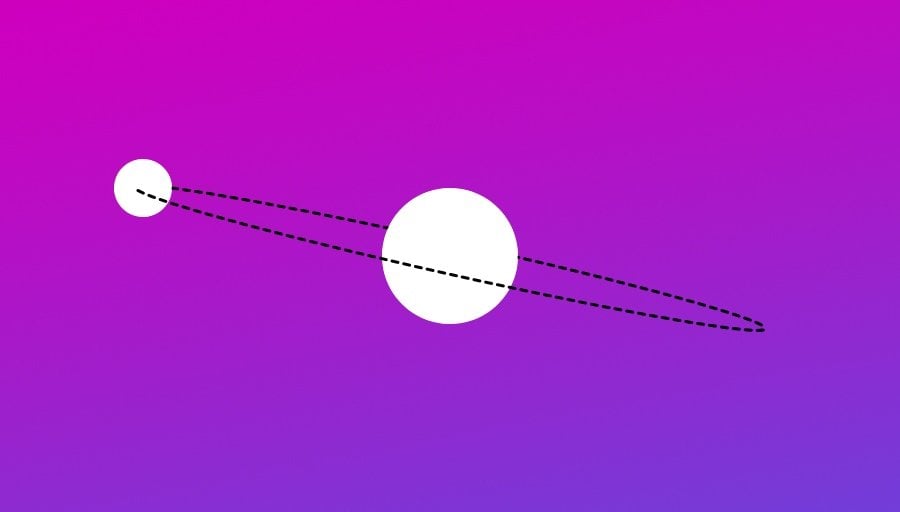
Совершенно реальные 2D-миры невозможны. 2D и 3D — это просто модели, нарисованные для отражения восприятия людей. Проверьте, как выглядит Катто в 2D и 3D:

В этом уроке вы будете работать как с 2D так и с 3D движением. Но сначала вам нужно узнать об одном важном представлении: трансформации объектов в Unity.
Понимание трансформации игровых объектов
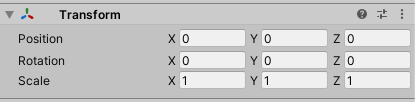
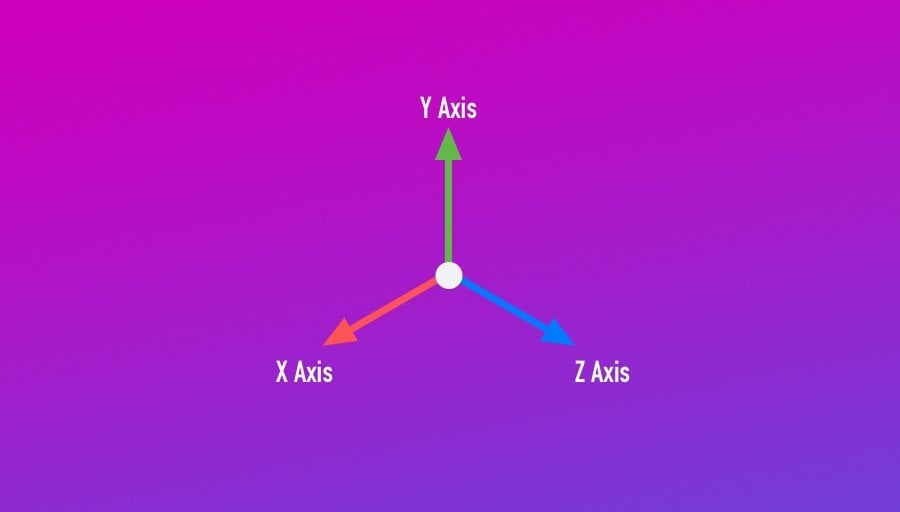
Инструмент Transform состоит из 3 компонентов. Position — в основном представляет собой точку в трехмерном пространстве. Rotation — определяет ориентацию объекта в трехмерном пространстве. И компонент Scale — определяет размер игрового объекта.

В Юнити вы можете видеть три компонента инструмента Transform следующим образом:

Обратите внимание, что у значений Position, Rotation и Scale также есть значения X, Y и Z. Каждый набор значений X, Y и Z известен как Vector3.
Теперь, когда у вас есть эта информация, вы можете переходить к первому типу игры: 2D-платформеры.
Реализация движения в двумерной игре-платформере
В качестве первого шага вы поработаете над созданием движения в 2D-платформере. Вот некоторые примеры опубликованных игр в этом жанре: Super Mario Bros., Sonic, Castlevania, Ghouls ‘n Ghosts, Rayman Legends, Mega Man, Metroid и Ninja Gaiden.
Многие думают, что платформеры проще всего программировать просто потому, что они выглядят простыми. Персонаж прыгает с одной платформы на другую, насколько это может быть сложно, правда? На самом деле, 2D платформеры сегодня могут быть очень сложными. Скоро вы поймете почему.
Настройка игровой сцены
Откройте сцену в RW/2D Platformer Movement/Scenes.
Это окно Hierarchy:

Разверните Player Objects. Вы поработаете с PaperCatto.
Если вы не видите PaperCatto в окне Scene, то вот простая хитрость: выберите его в окне Hierarchy, нажмите на кнопку F в окне Scene, затем нажмите на кнопку 2D View.

Добавление движения
Есть два типа движений:
- Движение при помощи Translation — это движение от точки к точке в физическом пространстве. Другими словами, персонаж двигается из позиции A в позицию B .
- Эмоциональное движение — это не технический термин, но вы будете использовать его в данном уроке, чтобы охватить движения, которые делает персонаж без использования первого метода. Например, жесты, дыхание и размахивание руками — это движения, которые передают намерения или чувства, поэтому такое название.
Выбрав PaperCatto, придайте Катто некоторые физические свойства. Это позволит ему передавать движения и перемещаться. Добавьте компонент Rigidbody 2D:

Чтобы Катто проявлял чувства и выражал позу, добавьте компонент Animator:

И наконец, Котто нужен компонент Box Collider 2D, чтобы была возможность сталкиваться с другими объектами:

Теперь нажмите кнопку Play.

Упс, это выглядит неудобно! По крайней мере, это работает.
Настройка движения
Итак, Катто теперь может двигаться, но вам все еще нужно сделать некоторые исправления, чтобы заставить его двигаться правильно. Разверните компонент Box Collider 2D и нажмите на кнопку Edit Collider.

Теперь у вас должна быть возможность редактировать границы двумерного коллайдера. Расширьте их так, чтобы коллайдер полностью покрывал Катто.

Вы можете нажать и перетащить указатели прямоугольника столкновений, чтобы получить нужную форму.
Измените параметр Gravity Scale на 2 в компоненте Rigidbody 2D. Он контролирует величину силы тяжести, которая применяется к Катто. Низкое значение, например 1, заставило бы Катто прыгать очень высоко, как если бы Катто был на Луне. Например, 2 делает силу прыжка в этом конкретном случае большее естественной.

И наконец, в разделе Constraints убедитесь, что отметили Freeze Rotation Z. Это предотвратит падение Катто во время бега.
Реализация Animator Controller
Последнее, но не менее важное: подключите компонент Animator Controller. Выбрав PaperCatto, разверните Animator, затем выберите PaperCatto в качестве контроллера:

Нажмите Play и… Вуаля! Разве это не самая красивая бумажная кошка, которую вы когда-либо видели?

Написание скрипта движения для 2D-платформера
Итак, PaperCatto двигается, но вам все еще нужно, чтобы он правильно реагировал на пользовательский ввод. Чтобы сделать это, понадобится скрипт.
Представьте, что вы хотите создать игру в стиле Super Mario Bros. с Катто в главной роли. Какое движение вам нужно? Что ж, вам нужно будет водить Катто по осям X и Y и поворачивать его:
- Ось X определяет, идет ли Катто вправо или влево.
- Ось Y позволяет перемещаться вверх и вниз для прыжков и падений.
- Вращение вокруг оси Y позволяет повернуть Катто так, чтобы он смотрел в правильном направлении при движении.

Здесь Катто перемещается по оси X, двигаем его слева направо и обратно:

Здесь Катто вращается вокруг оси Y, поворачиваем его слева направо и обратно:

Примечание. Вместо вращения Катто вокруг оси Y, чтобы перевернуть его слева направо, вы также можете масштабировать его по оси X, где -1 перевернет его влево, а 1 — вправо».
Перемещение Катто вправо и влево
Теперь, когда вы знаете, какое движение вы хотите, чтобы у Катто было, пора написать сценарий, который его реализует.
Начните с перетаскивания файла CattoMovement.cs в PaperCatto, чтобы добавить скрипт в качестве нового компонента:

Следующий шаг — написать скрипт.
Дважды нажмите на CattoMovement.cs, чтобы изменить его.
В скрипте будут три главные группы переменных. Первая группа сохраняет компоненты. Добавьте эти две строчки в позицию //1:
Эти две строчки кода содержат информацию для перемещения и анимации Катто соответственно.
Здесь вы структурируете переменные в соответствии с логикой «Защита, Тип и Имя»:

Обратите внимание, что чем проще имена переменных, тем легче их читать.
Чтобы использовать компоненты Animator и Rigidbody 2D вы должны указать Unity запомнить их. Итак, теперь вы должны сообщить Юнити, что делать и где найти эту информацию.
Добавьте следующий код, чтобы метод Start выглядел следующим образом:
Эти две строчки сообщают Unity: «Привет, Юнити, cattoRigidbody2D — это компонент Катто, так что найди его там и пожалуйста, запомни. Затем сделай то же самое с cattoAnimator .»
Теперь вам нужно отслеживать состояние Катто. Например, вам нужно знать касается ли Катто поверхности или прыгает.
Вторая группа сохраняет логические значения. Добавьте следующие строчки кода в позицию //2:
Переменная логического типа cattoIsFacingRight проверяет, действительно ли Катто смотрит в этом направлении. Переменная cattoIsJumping отслеживает, находится ли персонаж в воздухе, а cattoIsGrounded отслеживает, соприкасается ли он с поверхностью. Оба они по умолчанию имеют значение false .
Когда вы делаете имена переменных понятными, вы экономите время, особенно если вам нужно вернуться для отладки кода после того, как некоторое время не работали над проектом.
Даем Катто способность прыгать
Эта последняя группа переменных хранит ввод и специальный компонент, позволяющий прыгать. Добавьте эти шесть переменных в позицию // 3:
Переменная groundCheck использует groundCheckRadius , чтобы оценить, находится ли Катто на поверхности.
LayerMask — удобный инструмент Unity для разделения и упорядочивания мирового пространства на уровни. На простом английском языке говорится: «Эй, Юнити, эти два объекта находятся в одном пространстве, поэтому они должны взаимодействовать друг с другом». В этом случае Катто и поверхность находятся в одном пространстве, поэтому они сталкиваются.
Последние три переменные хранят числа с плавающей запятой, которые в конечном итоге будут двигать Катто.
Двигаемся дальше, Update — отличное место для опроса нажатых кнопок, так как данная функция вызывается каждый кадр.
Катто не найдет Ратто, если не сможет двигаться, поэтому так держать!
Завершение движения
Впереди две задачи: проверить, действительно ли Катто находится на поверхности, и проверить ввод с клавиатуры.
Добавьте следующий строчки кода в метод Update :
Physics2D.OverlapCircle — удобная встроенная функция, которая информирует Unity, когда два объекта сталкиваются в заданной области. Вы объявили две переменные groundCheck и groundCheckRadius , чтобы воспользоваться преимуществами этой функции.
Переменная moveInput кеширует горизонтальную ось клавиатуры. Популярная викторина: знаете ли вы, какой тип у этого значения?
Да! Это тип float . Что коррелирует с X-компонентом Vector3.
Далее вам нужно добавить четыре координаты в логику движения. Вы будете решать их, один за другим.
Добавление условий к движению
Сначала добавьте следующий код ниже двух переменных, которые добавляли в последнем разделе:
Данное значение в аниматоре определяет, будет ли Катто выглядеть так, как будто он идет — когда у него большая скорость — или стоит на месте — когда его скорость близка к нулю.
Это переводится как «Если cattoIsGrounded равно true , то установить Velocity аниматора на значение moveInput . Хотя moveInput может быть положительным, оно также может быть и отрицательным, поэтому используйте Math.Abs , чтобы moveInput оставалось положительным. Спасибо, C#, пока».
Добавьте второе условие следующим образом:
Оператор if проверяет, нажал ли игрок на кнопку прыжка и находится ли Катто на поверхности. Если так, то Unity будет рассматривать это как истину. Если оба значения истинны, то переменной cattoIsJumping будет установлено значение true .
И наконец, как и прежде, этот код говорит: «Эй, Юнити, возьми Animator и установи триггер Jump так, чтобы Катто выглядел так, как будто он прыгает».
Вот третье условие:
В этот раз, вы проверяете, нажал ли игрок на кнопку со стрелкой вниз и имеет ли переменная cattoIsGrounded значение true .
Если это так, то вы говорите: «Эй, Юнити, пожалуйста, перейди к cattoAnimator и установи логическую переменную Crouch на значение true , чтобы Катто выглядел так, как будто приседает. Спасибо».
И для последнего условия:
Если игрок только что отпустил кнопку со стрелкой вниз, перейдите cattoAnimator и установите Crouch на значение false . Это заставит Катто снова встать.
Вы только что выполнили несколько очень важных движений: ходьба, прыжки, приседание и снова вставание. Далее вы сделаете что-то еще более интересное!
Отражение спрайта Катто
На следующем этапе вы напишите специальную функцию под названием FlipCatto . Угадайте, что она делает!
Добавьте следующий код:
Обратите внимание, что вы устанавливаете переменной cattoIsFacingRight противоположное значение каждый раз, когда вызываете функцию.
Затем вы сохраняете Vector3 с именем cattoScale и передаете ему текущий масштаб Катто. Вы умножаете cattoScale на отрицательное значение единицы, что дает вам противоположное изображение. Вот так можно повернуть Катто.
И наконец, для правильной работы отраженное изображение устанавливается в качестве нового изображения по умолчанию, пока Катто не повернется в другую сторону снова.
Проще простого, не так ли?
Отражение спрайта Катто в соответствии с его движениями
С этого момента код находится внутри метода FixedUpdate , так как именно здесь Unity рассчитывает физику.
Добавьте следующий код:
Здесь вы устанавливаете вектор скорости компонента Rigidbody 2D. Чтобы перемещаться влево и вправо, вы устанавливаете ось X как moveInput с клавиатуры со скоростью cattoSpeed , оставляя ось Y нетронутой. Сейчас персонаж прыгнет.
Вы выполнили три последних условия!
Сначала добавьте эти два оператора if ниже:
На английском языке первое выражение гласит: «Если Катто смотрит не в правильном направлении, и кто-то нажимает клавишу, чтобы переместиться вправо: переверните Катто.» Оператор else if противоположен: «Если Катто смотрит вправо и ввод указывает налево: переверните Катто».
Теперь, для последней настройки, добавьте этот код ниже:
В этой части просто используется встроенная в Unity функция под названием AddForce . Вы добавляете силу специально по оси Y компоненту Rigidbody2D . Обратите внимание, что вы проверяете, прыгает ли Катто прежде чем делать что-либо еще.
Наконец, вы устанавливаете переменной cattoIsJumping значение false. Так что следующий раз он окажется на поверхности и сможет прыгать.
Вернитесь в окно Hierarchy, найдите CheckGround внутри PaperCatto и перетащите этот объект в окно Inspector.
Попробуйте установить следующие значения:
- Ground Check Radius = 0.07
- Ground = Ground
- Catto Speed = 6.11
- Catto Jump Force = 550

Последняя настройка. Перейдите к CheckGround и установите его позицию на -1.18 по оси Y:

И наконец, нажмите на кнопку Play и удивитесь этой кошачьей натуре!

Кодирование 2D-движения с видом сверху
Движение с видом сверху — это когда игрок воспринимает одну из осей движения как плоскую. То есть, вы воспринимаете Катто, идущим на заднем плане, когда нажимаете вверх. Сравните это с PaperCatto, который прыгает на месте, когда вы нажимаете вверх.
Среди выпущенных игр этого жанра: Bomberman, Golden Axe Warrior, The Legend of Zelda, BattleShip and HALO Spartan Assault.
Подключение элементов
Откройте сцену в RW / 2D TopDown Movement / Scenes.
Теперь в окне Hierarchy выберите Player Objects > Catto > Catto, тот, у которого есть Sprite Renderer.
Добавьте в окне Inspector следующие элементы:
- Rigidbody 2D
- Box Collider 2D
- Animator
Вот вам вызов: попробуйте добавить эти элементы самостоятельно. Если у вас возникли проблемы, воспользуйтесь этой помощью:

Компонент Animator не будет работать без параметра Controller. Итак, перейдите в 2D TopDown Movement / Models / Catto и найдите контроллер CattoAnimator. Перетащите его в параметр Controller компонента Animator в окне Inspector:

Нажмите Play и … Катто падает. Чтобы это исправить, вам нужно настроить Rigidbody 2D. Гравитация заставляет Катто падать, поэтому установите для свойства Gravity Scale значение 0 и повторите попытку.

Превосходно! Катто остается на месте. С этой точки зрения он выглядит так, как будто он на самом деле стоит на полу. Однако он все еще не может двигаться.
Написание 2D скрипта движения с видом сверху
Перейдите в 2D Top Down Movement / Scripts и перетащите TopDownMovement.cs в Catto. Вы также можете сделать это:

Идеально! Дважды щелкните на скрипт в окне Inspector, чтобы отредактировать его. Этот скрипт кажется намного проще предыдущего.
Теперь добавьте эти три переменные:
В методе Start вы указываете Unity что делать с cattoAnimator. Используйте GetComponent , чтобы редактор Unity связал имя cattoAnimator с Animator, прикрепленным к игровому объекту.
Добавьте этот код:
Так же как раньше используйте Update для получения ввода с клавиатуры. Добавьте этот код:
Переменная movement содержит информацию по горизонтальной и вертикальной осям с клавиатуры.
Это будет примерно так:

Три вызова cattoAnimator используют SetFloat , встроенную функцию Unity. По сути, это переводится как: «Эй, Unity, поищи Horizontal в cattoAnimator . Как только это сделаешь, передай значение movement в функцию».
В данном случае, movement.x — это просто компонент оси X . То есть:

А что насчет последнего вызова? Какая величина?
Magnitude — это результат, который вы получаете из двух векторов, которые борются друг с другом. Поскольку вам нужно движение по диагонали, C# вычисляет magnitude за вас.
Почти готово… Не забудьте установить Velocity в окне Inspector. 3 — хорошее значение для начала.
Нажмите Play и …

Готово! Но подождите, это еще не все.
Перейдите в 2D TopDown Movement/Scripts и добавьте CollectCoins.cs к Катто. Теперь вы действительно можете играть в игру.
Превосходно! Вы закончили движение в 2D-игре с видом сверху.
Нажатие мышью в 3D для вращения и перемещения
Добро пожаловать в 3D-миры! С этого момента все игры, которые мы будем рассматривать, будут в трехмерном пространстве.
Игры с нажатием мышью и указанием курса для поворота и движения используют тип движения как в игре «Diablo», когда вы нажимаете на что-нибудь, чтобы получить контекстную информацию и/или двигаться в определенное место.
Другие примеры выпущенных игр в этом жанре: League of Legends, Age of Empires, Grim Fandango and Monkey Island.
Подключение элементов
Откройте сцену в 3D ClickToRotate Movement / Scene.
Итак, теперь вы знаете, что делать: вам нужно сначала все подключить. Добавьте к Катто следующие компоненты:
- Box Collider
- Rigidbody
- Animator
Вот как это сделать:

Вам также необходимо изменить размер коллайдера. Совет: переключитесь на 2D-вид, чтобы облегчить определение размера.

Разверните Rigidbody в окне Inspector. Перейдите в Constraints, затем заморозьте вращение по осям X , Y и Z , установив флажки.
Чтобы подключить CattoAnimator, разверните Animator в окне Inpector. Перейдите к 3D ClickToRotate Movement/Models/Catto/Animator и перетащите его в Controller.
Вы можете сделать то же самое для Avatar или просто подключите его в окне Inspector:

Наконец, не забудьте отметить Apply Root Motion.
Вот как выглядит финальный результат:

Нажмите на кнопку Play. Катто покажет стандартную анимацию ожидания, хотя он еще не может двигаться.

Итак, теперь вы настроили Катто для анимации. Далее вы заставите его двигаться!
Добавление NavMesh Agent
Есть специальный модуль, который нужен Катто, он называется NavMesh: Nav для навигации, Mesh для … э … mesh: V. Серьезно, это сетка: очень примитивная форма, в которой хранится информация о расстоянии, положении и других простых вычислениях.
Agent — это программа, которая автоматически выполняет определенные задачи.
NavMesh Agent для работы нужен NavMesh
Найдите Nav Mesh Agent в окне Inspector и добавьте его к Катто. Следующие настройки работают прекрасно:

Не бойтесь экспериментировать, особенно с параметрами steering.
Примечание: в этой сцене уже есть NavMesh. Если вы хотите создать свой собственный, вкладка навигации находится под Window > AI > Navigation.
Написание скрипта для поворота и перемещения
Откройте ClickToMove.cs в папке 3D ClickToRotate Movement/Scripts.
Добавьте следующую строчку кода в начало файла:
Это дает вам доступ к NavMeshAgent .
Затем добавьте три переменные в начало класса:
На этот раз вы пишите переменную типа NavMeshAgent . Но вы уже знаете, как это работает.
Как и раньше, вы инициализируете переменные в методе Start :
Есть обязательная функция для игр, использующих перемещение при помощи мыши: Physics.Raycast .
Добавьте этот код в метод Update :
Что тут происходит? Когда игрок нажимает левую кнопку мыши, текущее положение курсора мыши на экране (2D-координата) преобразуется в луч при помощи ScreenPointToRay . Затем луч переносится в 3D-сцену с помощью Physics.Raycast , техники, известной как проверка попадания. Ключевое слово out указывает, что результаты попадания должны храниться в предоставленном параметре hit .
И наконец, вы устанавливаете для cattoNavigation.destination значение hit.point , как только луч проверки попадает во что-то, что должно быть там, где была нажата мышь в трехмерном пространстве.
Вызов cattoAnimator , как вы видели ранее, запрашивает анимацию ходьбы.
Говоря простым языком, «Эй, Unity, выстрели лучом, в который я щелкнул, и установи пункт назначения Катто на то место на земле, куда попадет этот луч».
Последний if сравнивает расстояние между двумя точками: где вы щелкнули и где Катто должен остановиться. Вы можете изменить это значение в окне Inspector.
Добавьте скрипт ClickToMove к Катто и запустите игру. Следуйте по пути, чтобы найти Ратто!

Поздравляю! Вы узнали, как перемещать персонажа в трех разных типах игры. Остался еще один.
3D движение танка
Идея о том, что танки должны перестать двигаться, чтобы повернуть, широко распространена в Интернете. Вот почему такое движение называется танковым. Однако первым танком был Mark I, и он отличался хорошей способностью поворачиваться даже в движении. Вопреки распространенному мнению, танки могут поворачиваться и двигаться одновременно, как и персонажи в играх с таким типом движения.
Во всяком случае, вот вкратце о танковом движении:
- Клавиша вверх — это всегда направление вперед для игрока, от перспективы персонажа.
- Когда вы нажимаете влево или вправо, персонаж совершает неподвижный поворот.
Выпущенные игры этого жанра: Resident Evil, Back in 1995 и Silent Hill
Подключение элементов
Откройте сцену в RW / 3D Tank Movement / Scenes.
Выберите Tankatto в окне Hierarchy под Player Objects.
Вы уже знаете строевую подготовку на данный момент. Можете ли вы придумать компоненты для этого в 3D?
Танкатто нужен Box Collider для взаимодействия с миром и Rigidbody, которым будет управлять и двигать игрок.
Вот наглядное пособие:

Не забудьте отредактировать коллайдер:

Перейдите в 3D Tank Movement / Scripts и перетащите TankMovement.cs на Tankatto. Затем откройте его, чтобы отредактировать.
Вот как это должно выглядеть после добавления остальных компонентов:

Написание скрипта движения танка
В вашем исходном скрипте есть шесть разных переменных. Как и раньше, каждый из них относится к чему-то, что вам нужно переместить или оживить Катто. Три из них связаны со скоростью, один — для Rigidbody и два — для ввода.
Добавьте эти переменные в начало скрипта:
Вызов: какой компонент вы будете кэшировать при выполнении метода Start ?
Да, это компонент tankRigidBody .
Еще одна мини-задача: где бы вы кэшировали turnInput и movementInput ?
Правильно, в методе Update .
Как вы знаете, этот тип игры зависит от двух типов движения: поворот и движение вперед. Итак, на следующем этапе вы научите Катто, как поворачиваться.
Поворачивание Катто
На этот раз вам нужно рассчитать физику движения Катто в методе FixedUpdate, но вы узнаете, как делать это простым способом. Вместо того, чтобы писать и управлять всем кодом внутри функции Unity, напишите код отдельно.
Добавьте эти короткие строчки кода в метод FixedUpdate :
Как видите, названия функций представляют их действия.
Теперь добавьте весь код, чтобы сделать Turn() красивой отдельной функцией:
Что здесь происходит?
Учтите, что turnInput и turnSpeed считываются несколько раз в секунду. Вы должны взять ситуацию под контроль.
Итак, вы передаете turnInput , умножаете его на turnSpeed , чтобы получить хорошее число, а затем ограничиваете временной цикл примерно секундой с помощью Time.deltaTime .
Примечание. В Unity есть также fixedDeltaTime , но объяснение выходит за рамки данного проекта.
Такой расчет дает вам уточненное число, которое вы просто называете turn .
На изображении ниже указан порядок выполнения:

Когда вы перейдете к turnRotation , то увидите функцию Quaternion.Euler . Теория кватернионов обширна и сложна. Достаточно сказать, что это связано с вращением.
Функция Unity MoveRotation (Quaternion rot) заставляет вас использовать Quaternion. Но подождите, разве вращения не являются Vector3 в Unity, как сказано в начале урока?
Unity решает эту проблему за вас. Quaternion.Euler берет три числа: X , Y и Z .
В этом контексте, можете ли вы угадать, по какой оси вы вращаете Катто?
Если вы угадали Y , то вы правы!
У вас уже есть число … число в turn . Итак, передайте его как Y в Quaternion.Euler (X, Y, Z) .
Это выглядит так: Quaternion.Euler (0, turn, 0) .
Последняя функция MoveRotation берет текущее вращение Танкатто и умножает его на только что вычисленное turnRotation . Взгляните на порядок выполнения:

Перемещение Катто
Теперь последний шаг: заставить Танкатто двигаться вперед. Для начала создайте новую функцию с именем Move() следующим образом:
Эта последняя часть заботится о движении … она почти такая же, как и предыдущая.
Как и раньше, вы сохраняете переменную, которая содержит ввод с клавиатуры, скорость, которую вы определили с помощью Inspector и Time.deltaTime .
Тогда почему на этот раз переменная movement это Vector3 ? Это просто: transform.forward — это Vector3 (0, 0, 1) .
И наконец, MovePosition принимает параметр movement и добавляет его к текущему положению Танкатто.
Танкатто еще не может двигаться. Не забудьте установить значения в Инспекторе. Вы можете использовать эти числа или изменить их по своему усмотрению:
- Tank Speed = 6
- Movement Speed = 40
- Turn Speed = 60
Нажмите Play и проверьте, все ли работает так, как задумано.
Вы можете подумать: а где же самое интересное в перемещении и вращении танка?
Помните, что у Танкатто есть компонент Missile Logic в окне Inspector, но изучение того, как он работает, не входит в данный урок. Теперь, когда вы зашли так далеко, он нужен только для того, чтобы оживить ситуацию.
Нажмите кнопку мышки и посейте хаос!
Между прочим, вопреки тому, что некоторым кажется, ни одна крыса не пострадала при создании этого игрового жанра.
Катто и Ратто — хорошие друзья. Ракеты в этой игре — всего лишь манекены, цель игры состоит в том, чтобы столкнуть другого с платформы.
Куда двигаться дальше?
Поздравляем с окончанием урока! Помните, что вы можете получить готовый проект, нажав кнопку «Скачать материалы урока» вверху страницы.
Жанр попойки, детка! Попробуйте смешать два или более жанра в одной игре. Смешивание — лучший способ открыть для себя что-то новое. Например, попробуйте перенести PaperCatto в 3D Tank Movement, как если бы это была бумажная мишень. Также можно попробовать сделать движущиеся мишени.
Вы определенно захотите проверить это, чтобы повысить свою ци как разработчика игр:
Как создать игру Bomberman в Unity. Или, если вам нравятся видео, посмотрите эту впечатляющую серию статей Брайана Моакли «Основы C#».
Большое спасибо за чтение и выполнения урока по разным типам движения в Unity. Если у вас есть какие-либо вопросы или комментарии, не стесняйтесь присоединиться к обсуждению ниже!
Please wait.
We are checking your browser. pechenek.net
Why do I have to complete a CAPTCHA?
Completing the CAPTCHA proves you are a human and gives you temporary access to the web property.
What can I do to prevent this in the future?
If you are on a personal connection, like at home, you can run an anti-virus scan on your device to make sure it is not infected with malware.
If you are at an office or shared network, you can ask the network administrator to run a scan across the network looking for misconfigured or infected devices.
Another way to prevent getting this page in the future is to use Privacy Pass. You may need to download version 2.0 now from the Chrome Web Store.
Cloudflare Ray ID: 6d14162f9db42de7 • Your IP : 85.95.179.65 • Performance & security by Cloudflare
Game Dev Beginner

How to Rotate in Unity (complete beginner’s guide)
In Unity by John French July 13, 2021 23 Comments
Rotating an object in Unity can be very straightforward.
Just as there are many different ways to move an object, there are many different ways to rotate one too.
Which means that knowing the right method to use, in order to get the effect that you want, can be a little confusing at first.
But don’t worry, because in this in-depth guide I’ll show you all of the different methods for rotating an object in Unity, and the best time to use each of them, step by step.
Here’s what you’ll find on this page:
How to rotate an object in Unity
There are a lot of different ways to rotate an object in Unity.
Some methods are simple, some are more complex.
While others work best for certain tasks.
While there are a lot of different options available to you, many of them work in similar ways.
Which means that once you’re used to the basics of rotating an object in Unity, you’ll find it easier to use some of the more advanced rotation features that Unity offers.
So what is the basic method?
Rotation in Unity typically works by specifying an amount of rotation in degrees around the X, Y or Z axis of an object.
In the Inspector, you’ll see an object’s rotation as a Vector 3 value:
In the same way that a game object’s position in the world can be set using its Transform component…
Like this:
An object’s rotation can also be set directly via its Transform,
Like this:
In this example, I’ve set the rotation of the object to 10 degrees around the Y Axis.
Rotational vector 3 values describe a degree of rotation around each of the 3 axes, X Y and Z.
Notice, however, that I didn’t set the rotation property directly like I might do when setting an object’s position, for example.
Instead, I set a different property, Euler Angles.
Why did I do it like that?
Behind the scenes, Unity calculates rotation using Quaternions, meaning that the rotation property of an object is not actually a Vector 3, it’s a Quaternion.
The rotation value you see in the Inspector is the real Quaternion rotation converted to a Vector 3 value, an Euler Angle, which is rotation expressed as an XYZ value for pitch, yaw and roll.
So, when using Transform.eulerAngles, you’re essentially setting and reading a converted value.
This means that if you want to set the rotation property directly, you’ll need to use a Quaternion value instead.
Like this:
Or, instead of working in Quaternions, you can convert a Vector 3 Euler Angle rotation into a Quaternion.
Like this:
The Euler Angles property is a convenient way to set and read an object’s rotation in a format that’s easier to read and work with than Quaternions.
Quaternions vs Euler Angles in Unity
Should you use Quaternions or Euler Angles in Unity?
While Unity uses Quaternions behind the scenes, many of Unity’s rotation functions will allow you to use either type of value, either natively or by converting the value.
But which is better?
Generally speaking, Unity uses Quaternions because they’re efficient and avoid some of the problems of using Euler Angles, such as gimbal lock, which is the loss of a degree of movement when two axes are aligned the same way.
However, Quaternions are complex and aren’t designed to be worked with directly.
Euler Angles, on the other hand, are easier to read and work with.
Because of this, if you want to manually set a rotation, or provide a rotation amount in degrees, then it will be much easier to use an Euler Angle value to do so, and you’ll likely find that there’s an Euler based function available for you to do just that.
However, you may start to run into problems if you directly apply Euler Angle based rotation on a per axis basis or manually over time.
So what’s the answer?
It’s best to think of Euler Angles as a method of describing Quaternions in Unity.
They make reading and manually setting the rotation of an object easier to do.
Trying to work exclusively in Euler Angles can cause unexpected behaviour.
For example, the converted Euler Angle value can vary, since the same Quaternion rotation can be described using different Euler values, or you might reintroduce gimbal lock by trying to work only with Euler Angles in local variables.
In practice, when using Unity’s built-in rotation functions, you shouldn’t need to worry about gimbal lock, even when passing in Euler Angles.
Unity will convert the Euler value and work with Quaternions behind the scenes, avoiding the typical problems associated with Eulers, while keeping their ease of use.
So while it’s generally better to use Quaternions when you can, there’s nothing wrong with using Euler Angles with Unity’s built-in rotation functions.
Setting the rotation of an object directly via its rotation property can be very straightforward.
While this works well for setting an absolute rotation, one time, it’s not as useful for adding rotation to an object.
For example, to rotate an object by a set amount of degrees from its current orientation to a new one.
For that, you’ll need the Rotate function.
How to Rotate an object in Unity using the Rotate function
While setting the Euler Angles property of an object changes its absolute rotation, there will often be times when you want to add an amount of rotation to an object instead.
For example, to turn an object round by 90 degrees:
Instead of setting the rotation directly, like before, the Rotate function adds 90 degrees to the Y-Axis every time it’s called.
Or you could add rotation every frame to make an object spin smoothly.
Like this:
In this example, I’m multiplying the rotation amount by Time.deltaTime (the duration of the last frame) to make sure that the rotation is smooth and consistent.
Even if you’re a beginner, you may have already multiplied values by Delta Time before in Unity, as it’s usually required for any kind of function that occurs over time, such as movement, rotation or lerping. This is to make sure that, even if the framerate changes, the amount of movement over time remains the same.
In this case, it changes the amount of rotation from 20 degrees per frame to 20 degrees per second.
Which looks like this:
Rotate vs Rotation in Unity
Typically, Rotation in Unity refers to the rotation property of an object. In other words, the rotation values you see in the inspector, while Rotate is a function for adding an amount of rotation to an object.
So if you want to read the rotation of an object, or set it directly, you’d typically use the rotation property (or the Vector 3 shortcut: transform.eulerAngles). Whereas, if you want to apply an amount of rotation to an object, the Rotate function is designed to do exactly that.
Local rotation vs world rotation
An object’s rotation in Unity can be relative to the world or it can be local, where the rotation amount is relative to the rotation of its parent object.
Both an object’s local rotation and its absolute world rotation can be read as properties of the object’s transform.
A lot of the time, the local and world rotation of an object will be the same.
This is because, either the object that’s being rotated doesn’t have a parent object or because that parent object doesn’t have any rotation applied to it, in which case there’s no difference between the two values.
For example, if you rotate a child object by 90 degrees but don’t apply any rotation to the parent object, then the world rotation and the local rotation of the child object will both be the same.
This makes sense, because the child object has an amount of rotation applied to it which, when added to the parent’s rotation of zero, matches the object’s real rotation in the world.
However, if you only apply rotation to an object’s parent then the local rotation value for the child object will be different.
While the world rotation will match the parent, the local rotation will be zero, as no rotation is being applied by the child object’s transform.
Put simply, the world rotation value is the absolute rotation relative to world space. In this example, it’s the rotation of the parent object plus any locally applied rotation, if there is any. While the local rotation value is just the extra rotation added by that object’s Transform component.
So, which one should you use?
When working with rotation directly, for example when setting the rotation of an object via its Euler Angle property, you’ll have the option to set either its world rotation or its local rotation.
By default, when setting rotation directly, you’re setting the object’s world rotation:
Setting the world rotation of a child object will rotate it into that position absolutely.
This means that if the object has a parent with any rotation, the local rotation of the child will not be set to the new rotation value as you might expect. Instead, it will be set to a value that is equal to the difference between the parent’s rotation and the world rotation.
Basically, the local rotation will be set to whatever it needs to be in order to achieve the absolute world rotation you specified.
For example, if you set a child object to a world rotation of 50 degrees around an axis, and the object’s parent is already rotated by 10 degrees, the child object’s rotation will be set to 40 degrees, not the 50 you passed in.
The rotation of the object will technically be correct, you’ll get exactly what you asked for, but you may get some confusing results if you apply world rotation to child objects in this way.
So if you find that, when setting the rotation of an object via scripting, the Inspector values and the rotation don’t match, it might be because you’re setting the world rotation of a child object.
If, however, you only want to apply rotation locally, you can do that by using the local rotation value:
A lot of the time, this won’t make any difference.
When the object you rotate doesn’t have a parent, or if the parent isn’t rotated, using either method will produce the same effect.
However, there may be times when you’d like to position an object one way and rotate it another.
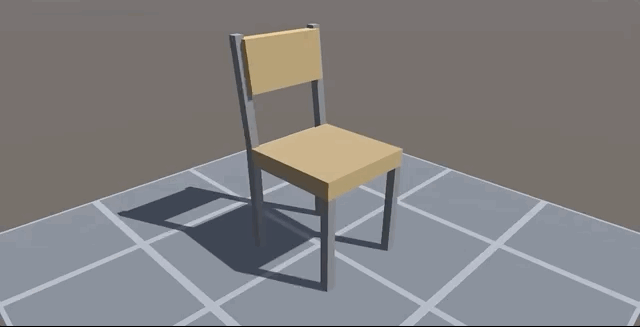
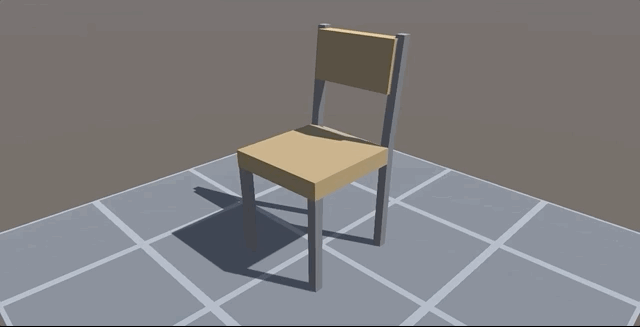
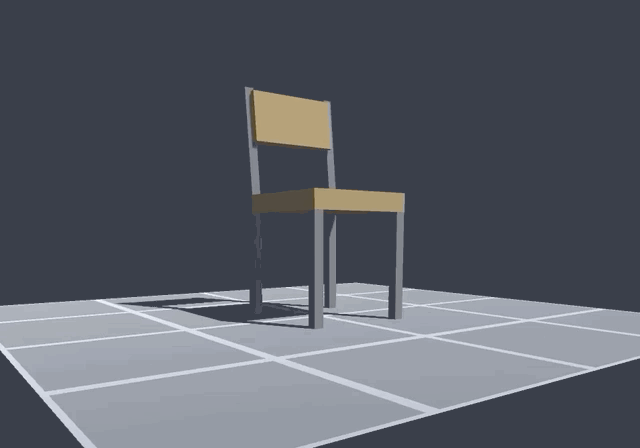
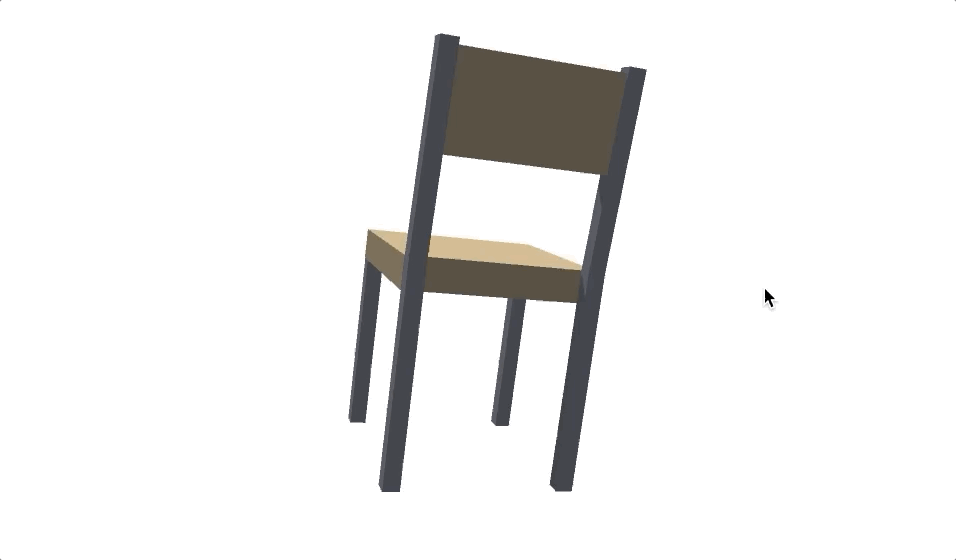
For example, if you want to spin an object that’s already rotated, like this titled chair:
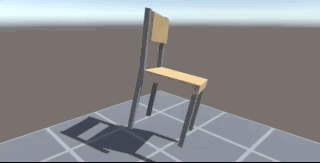
This chair is already rotated but spins on a flat Y-Axis.
One of the easiest ways to achieve this, and other rotation effects like it, is to simply nest the object inside another empty game object.

The child object can then be tilted to any local rotation you like, while the parent container can be automatically rotated on a flat Y-Axis in world space.
Separating the orientation of an object from its rotation like this can be useful for making rotation simpler to manage and easier to control.
Alternatively, if you don’t want to nest objects together, many of Unity’s built-in rotation functions, such as Transform Rotate can be overridden to operate in local or world space, recreating this effect, without the need for additional game objects.
How to rotate an object around a point in Unity
Rotating an object in Unity around one of its axes can be very simple.
For example, spinning a cube or turning an object upside-down can be very straightforward.
As you start to rotate more complex objects, you may begin to notice that the position of the pivot point around which an object rotates is just as important as the rotation itself.
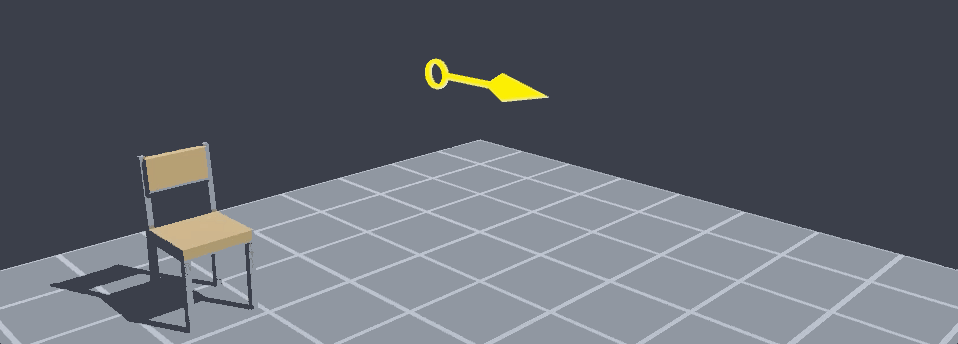
For example, if you build a basic door out of some primitive shapes, and then try to rotate it by 90 degrees to open it, you’ll quickly notice that something is wrong.
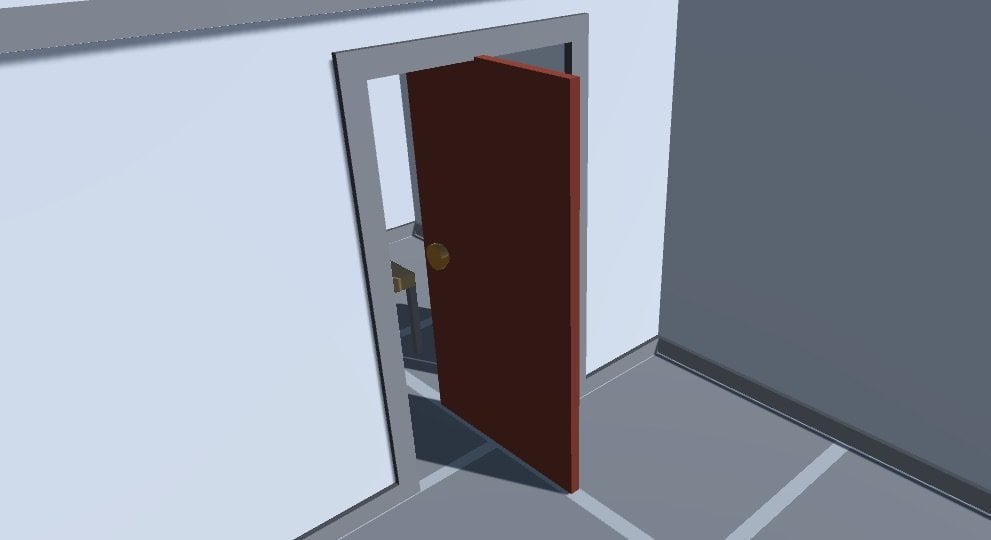
This is not how doors work.
In this example, I’ve built a door out of primitive objects, which means that the pivot point for the parent object, the main part of the door in my case, is in the centre.
This means that, when I rotate the object on its Y-Axis, it rotates around its centre.
Which, as I’m sure you’ve noticed, is not how most doors work.
So what can I do about it?
To fix it, I need to change the pivot point of the 3D object.
How to move the pivot point of a 3d object
Usually, when working with 3D objects that have been created using other tools, the pivot point of the object is set when the object is created.
For example, if I purchase a door model from the Asset Store, chances are that the pivot point will be in the correct place, on the door’s hinge.
I didn’t do that so, instead, I need to move the pivot point to a different position that allows me to rotate the door in the way I want.
Luckily it’s an easy problem to solve, by adding the game object you want to rotate as a child of another object that can act as a pivot point.
Here’s how:
- Place the object you want to rotate in position
- Next, create a new game object, the pivot, and place it at the pivot point of the rotation. Keep it separate while you’re positioning it.
- Finally, in the hierarchy, drag the object you want to rotate on to the pivot object, making it a child of the pivot
Then, instead of rotating the object directly, simply rotate the pivot.
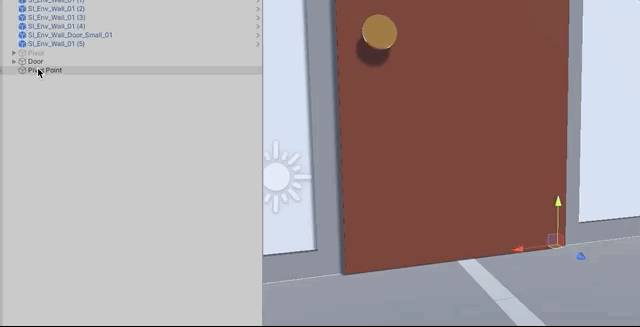
Creating a parent object is an easy way to change the pivot point in Unity
The same technique can be used to centre an object’s pivot point if, for whatever reason, it’s not already in the middle of your object.
You could even nest the root object (now the pivot) in another object that doesn’t rotate, and manage the local rotation of the pivot using a script.
Creating a parent object is an easy way to move the pivot point of an object.
However, it’s also possible to rotate an object around a point, without creating a parent object pivot, using Rotate Around.
How to use Rotate Around in Unity
Rotate Around works in a similar way to the parent object pivot method.
However, instead of creating a pivot point object and rotating it, the Rotate Around function takes a Vector 3 position, in world space, an axis to rotate around, and an angle in degrees.
This means that you can use Rotate Around to rotate an object either around a fixed point in world space,
Like this:
Or around another object entirely,
Like this:
When using Rotate Around, the first argument, the Vector 3 point, is the pivot of the rotation while the 2nd Vector 3, the axis, decides which direction rotation will be applied.
This is important, as it determines which route around the point the object will rotate.
Finally, the float value, the angle, is the amount of rotation that will be applied in degrees.
How to define an axis of rotation in Unity
Several of Unity’s built-in rotation functions, such as Rotate Around, require you to enter an axis parameter in the form of a Vector 3 value, to determine the direction of the rotation that’s applied.
Entering a vector, using XYZ values, creates the definition of direction that’s used to determine the rotational axis.
For example, a vector of (1,0,0) would rotate around the X-Axis, while (0,1,0) rotates around the Y-Axis and (0,0,1) rotates around the Z-Axis.
Entering a mix of values creates a direction vector that’s proportionate to the values entered.
However, most of the time, you’ll probably only need to enter basic Axis values which, helpfully, can be accessed using Vector 3 shorthand, such as Vector3.left for the X-Axis, Vector3.up for the Y-Axis and Vector3.forward for the Z-Axis.
While these shortcuts represent basic directions relative to world space, it’s also possible to define an local directional value by referencing an object’s Transform component.
So, while Vector3.up represents the global up direction, Transform.up represents up in relation to a game object’s Transform.
Just like the Rotate function, Rotate Around is only applied once when it’s called, which means if you want to create continuous rotation, you’ll need to call Rotate Around in Update, multiplying the angle value by Delta Time.
Like this:
Rotate Around can be used to create rotation around other objects and points without using the parent object method, which can be useful for rotating an object around another, without needing to rotate both of them.
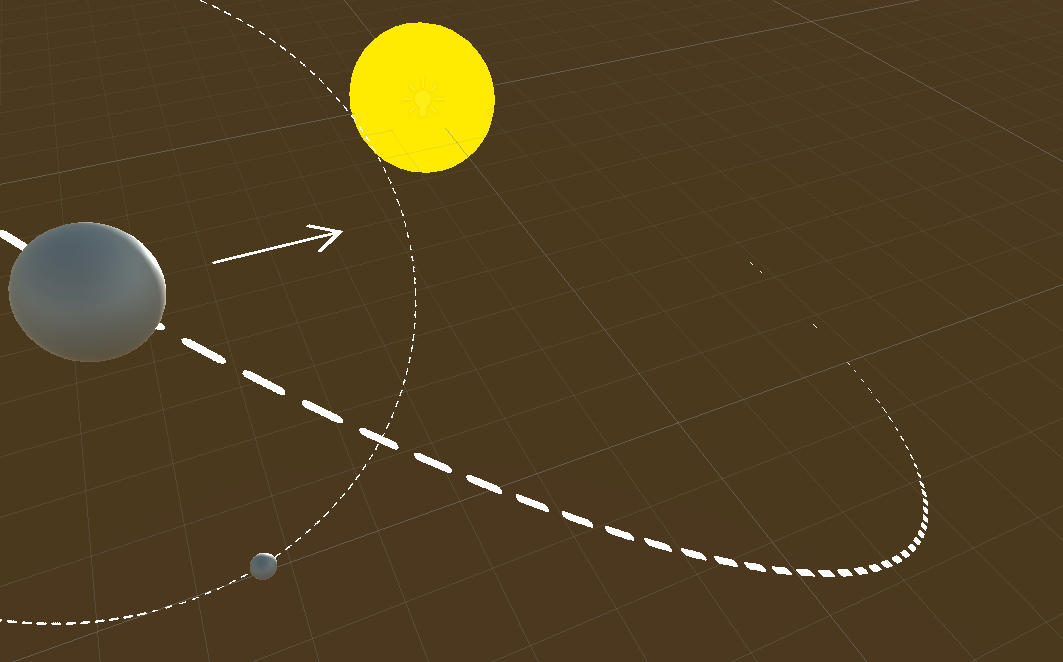
For example, I could use Rotate Around to create a basic orbit where the planet rotates around the sun and the planet’s moon rotates around the planet.

Rotate Around can be used to create a simple planetary orbit.
In this example, the moon is a child of the planet, which means that the moon’s position is being affected by the rotation of the planet.
While Rotate Around can be very useful and straightforward, there are a couple of drawbacks to using this method.
For example, if you use Rotate Around to move one object around another, and the object that’s being orbited moves, it’s going to affect the path of rotation.
And, while it’s possible to adjust the position of the object to avoid this, there’s another problem.
When using the Rotate Around function, the rotating object turns towards the point it’s rotating around.
![]()
Using Rotate Around will also turn the orbiting object to face its point of rotation
This isn’t necessarily a bad thing.
However, if you’re making an object orbit another, like in this example, it isn’t really how planetary orbits work.
Planets tend to spin around their own axis, while their position orbits around the sun.
So how can you rotate one object around another, without turning the object towards its point of orbit?
How can you rotate an object’s position around a point, without rotating the object itself?
How to rotate a vector in Unity
A vector is a geometric value that defines a direction and length (which is the magnitude of the vector).
If you’ve worked with any kind of movement from one position to another, or done anything with Raycasts in Unity, then you will have used vectors before. Put simply, they describe direction and distance using Vector 3 values.
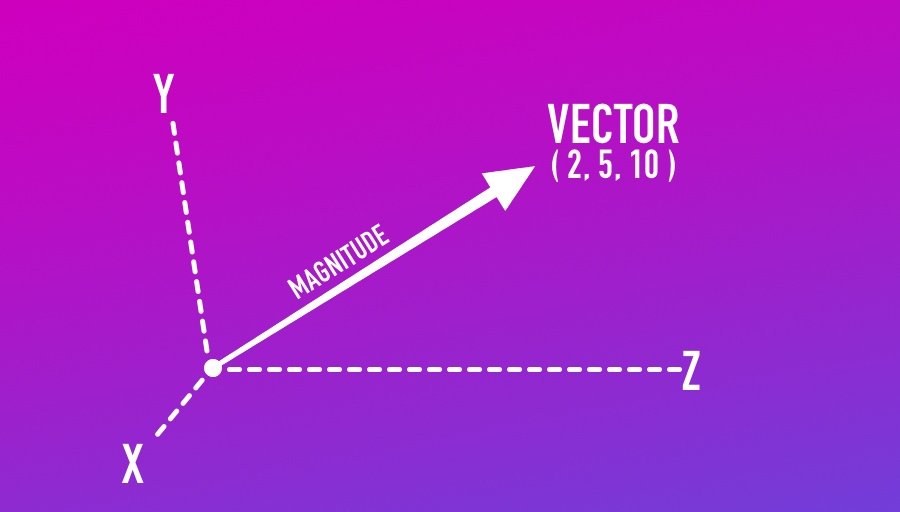
A vector is a definition of direction and distance (the vector’s magnitude).
However… did you know that you can also rotate a vector by multiplying it by a Quaternion?
This works by multiplying the Quaternion rotation by the vector you want to rotate.
Like this:
The resulting vector, which has now been rotated, can be used to calculate where the rotated object should be in relation to the object it’s orbiting.
Like this:
Which means that, using vectors, it’s possible to rotate the position of one object around another in Unity, without actually rotating the object itself.
Let’s say that I want to orbit one object, a planet, around another, the sun, at a radius of 10 units and at a speed of 30 degrees per second.
First, I need a Vector.
In this case, all I want to do is define a direction and a radius, which will be the distance from the sun that the planet should orbit.
For that, I can multiply Vector3.forward, which is shorthand for (0,0,1) by 10, the radius.
That will give me a vector of (0,0,10).
I can then rotate the vector with an angle value, which I can add to every frame at 30 degrees per second, to create a circular orbit.
Like this:
What’s happening here is that I’m taking a basic forward vector and rotating it from its starting point every frame by the angle value.
In this case, I’m rotating around the Y-Axis, but I could also have entered different values to produce different results.
Note, however, that the order of multiplication matters. When Multiplying a vector by a Quaternion the Quaternion must go on the left, otherwise, this won’t work (it won’t even compile).
Finally, because the vector that I’ve created and rotated isn’t attached to anything (it basically describes a vector from the centre of the world), I’ve set it as an offset to the position of the orbited object, the Sun.
The result is a rotation of a vector between two virtual points, not objects, that calculates where one object should be in relation to another, creating a path of rotation. The orbiting object behaves as if it’s nested, however rotating the sun has no effect on the planet and it’s possible to rotate the planet independently of its orbit around the sun.
In this example, I only rotated around the global Y-Axis, which is useful for creating an easy orbit.
However, if I wanted to, I could also set the rotation to match a specific direction-based axis.
For example, imagine that the planet is 10 units away but is also several units higher than the sun and I wanted to create a rotation based on that existing direction.
Getting the direction of the planet from the sun allows me to create an orbit on a tilt.
It’s possible to get a direction vector between two objects in Unity by subtracting their positions.
Like this:
I can then calculate a plane of rotation based on the starting direction and distance of the object from its point of orbit.
Like this:
In this example, I’m measuring the direction and the distance of the object in Start, which gives me my orbit direction and radius.
I’m also normalising the vector, which limits its magnitude to 1. This basically limits the vector to directional information only, and while you don’t need to do this, I’m doing it so that I can multiply the direction vector by the radius variable, allowing me to change it later.
Once I have a direction vector, instead of rotating it around the world’s Y-Axis, which would cause the planet to orbit somewhere above the sun, I’m creating a new Quaternion angle using the Quaternion Look Rotation function instead. Look Rotation basically turns a direction vector into a Quaternion angle.
Then, to get the combined angle, I can multiply the Quaternion direction angle (which is the amount of tilt) by the angle of rotation (the angle float variable) to combine the two angles.
I’m still using the basic forward vector as a starting point, however now, instead of only multiplying it by the angle of rotation, I’m also rotating it by the angle of direction as well.
This is useful for creating automatic planet orbits as now, all I need to do is position the object relative to the point or object I want it to orbit, and the script will calculate a trajectory around that object.
Planets can be given a more natural-looking orbit by rotating on an axis that’s based on their direction.
And if I want to change the axis of the orbit, I can do so by simply entering the angle into the X-Axis or the Z-axis instead.
This method is great for creating a path of rotation around a single axis.
However, there will often be times when you don’t want to just rotate one way around an object.
For example, what if you want to freely rotate a camera around the player using the mouse, or the keyboard, or using controller thumbsticks?
How can you pass input axes into a rotation function, to give the player control of the camera?
How to rotate the camera around an object in Unity
Being able to freely rotate the camera around an object with the mouse or other controls is a very common mechanic in many games; For example, to control the position of the camera around a player in 3rd-person.
In the previous example, moving a planet around the sun, I moved one object around another on a single plane of rotation, around the Y-Axis.
Rotating a camera around an object works in a similar way except, instead of a single fixed path, the player is able to freely move the camera around the object using two axes from the combined vertical and horizontal movements of the mouse, a controller thumbstick or keyboard keys.
So how do you do it?
One of the easiest ways to rotate the camera around an object is by using the Rotate Around function.
Using Rotate Around is an easy way to give the player camera control with the mouse.
The Rotate Around function rotates an object around another point, relative to its distance, while turning the object to face the pivot.
This makes it ideal for creating a mouse orbit camera, as it keeps the camera looking at the object.
Like this:
This works, first, by moving the camera so that it faces the target object, but set back by a distance that’s equal to the radius variable.
Notice that I’m using the forward vector of the camera object that this script is attached to, not Vector3.forward, which is the world forward, to keep the camera in position.
Then, using the Rotate Around function, the horizontal input of the mouse (its X-Axis) rotates around the target object around the Y-Axis, which moves the camera left and right around the player.
While the vertical movement of the mouse moves the camera relative to its own X-Axis, moving it up and down.
Using Rotate Around, the object that’s being rotated will turn towards the point that it’s rotating around. For this particular use case, this is ideal, as it means that the camera will look towards the object it’s rotating around automatically, providing a simple method of rotating a camera around an object.
It works well and it’s straightforward.
However, it is also possible to rotate the camera around an object without using the Rotate Around function.
Here’s how to do that…
How to rotate the camera around an object without using Rotate Around
While the Rotate Around function is a straightforward way to rotate the camera around an object, it’s not the only method.
Just as it was possible to orbit an object around a single axis by rotating a direction vector, the same method can be used to create 360 spherical rotation around a player or object.
The benefit of using this method over Rotate Around is that the rotation is entirely position based. Neither the object or the pivot point will be rotated as a result, which can be useful if, for whatever reason, you want to move an object around another with the mouse, but don’t want the object itself to rotate.
Like before it works by defining a basic vector, such as the forward vector, and then rotating it into position using inputs from the mouse.
Like this:
In this example, the X and Y movements of the mouse are added to two angle variables, angle X and angle Y.
To limit vertical movement, the Y angle is clamped at 89 degrees in both directions, to stop the camera from going over the top of the player and round again.
The X angle is also checked to see if it has moved past 360 degrees, or has moved below 0 degrees, in order to keep the value within a normal range.
This check isn’t strictly necessary, as the rotation function will work just fine without it, however keeping the value within a typical rotation range prevents a potential, although highly unlikely, problem of reaching the limit of the value type, as well as making the value easy to understand at a glance.
Finally, a forward vector, multiplied by a distance that’s equal to the radius, is rotated by the two angles, and the position of the camera is then moved to match.
Because this method of moving a camera around an object doesn’t affect the object’s rotation, I’ve used the Transform Look At function, which turns an object to face the direction of a Transform.
In this case, the Look At function is helpful for making sure that the camera is actually facing the player way when it’s rotated.
However, it’s not the only option for turning one object towards another…
How to rotate an object towards another
There are several methods available for rotating one object towards another.
Which one you use depends on how you want the object to rotate towards its target.
How to use Look At
Transform Look At, which instantly snaps an object’s rotation to face the transform of another object, is probably the easiest method of rotating an object towards a specific point.
Like this:
It takes a single Transform parameter, or a world position as a Vector 3, and will turn the object towards the target as soon as it’s called.
Look At is one of the easiest ways to make one object look at another.
Look At is great as a quick and easy way to snap an object’s rotation towards another object or towards another point in the world.
However, because it’s a function of an object’s Transform, it automatically rotates towards the object when you call it.
And while this can be extremely useful, there may be times when you want to calculate the rotation value required to look at an object, without actually looking at it.
The Quaternion Look Rotation function can help you do that.
How to use Look Rotation
Look Rotation basically turns a direction vector into a rotation value.
This can be useful for calculating the rotation value towards an object or point, but without actually turning the object to point at it.
For example, I could calculate the direction vector of two points by subtracting their positions.
Like this:
I could then pass that direction vector into the Look Rotation function to get a matching Quaternion rotation value.
Like this:
I now have the rotation required to look at an object as a Quaternion value.
Why would I want to do this?
Why wouldn’t I just use Look At to turn the object to its target?
While Look At can be used to instantly turn an object to face another object or point, depending on what you’re trying to do, you may not want the rotation to happen immediately.
Instead, you might want the object to rotate towards the direction of its target slowly and smoothly.
Following the direction of the target, instead of snapping to it.
And for that, Look Rotation can be used to give you a target value for an object to smoothly rotate towards.
So, now that you have a target, how can you smoothly rotate an object?
How to slowly rotate towards another object
Many examples of smoothly rotating an object towards another tend to use Lerp, which stands for linear interpolation, or Slerp, meaning spherical interpolation, to achieve this kind of eased movement.
However… this isn’t actually what interpolation functions such as Lerp and Slerp are used for.
Lerp and Slerp are typically used to carry out a single movement over a period of time, such as a rotation from one fixed position to another, or a movement between two points.
However, continuous movement, such as an arrow following the direction of a target, isn’t really what Lerp or Slerp are designed to do.
If using interpolation functions in this way gets you results that you like, then go ahead!
But… for continuously following the direction of a target, there’s a better function to use, Rotate Towards.
How to use Rotate Towards
Rotate Towards is a Quaternion function that works in a similar way to Move Towards, which you may have used before to move an object closer to a target.
It looks like this:
In the same way that Move Towards moves an object towards a target position a little bit each frame, Rotate Towards turns an object towards a target rotation each frame, without overshooting when it gets there.
The result is a smoothed movement towards a target rotation.
Rotate Towards turns an object towards a target each frame.
The target rotation is the direction vector of the object you want to rotate towards, which can be worked out by subtracting the target’s position from the object’s position.
The Look Rotation function then turns the direction vector into a Quaternion rotation.
Like this:
How fast Rotate Towards works depends on the Max Degrees Delta of the function, which limits how much the object can rotate in a single step.
Passing a degree value that’s multiplied by Delta Time into the Max Degrees Delta parameter sets the speed of the rotation in degrees per second.
Like this:
The Rotate Toward function is ideal for continuous movement, as it’s always rotating towards a target at a specific speed.
However, if you want to perform a single rotation movement over a fixed amount of time, for example, to rotate an object 90 degrees over two seconds, then Lerp and Slerp can help you to do exactly that.
How to rotate an object over time (Lerp & Slerp)
While Rotate Towards continuously rotates an object towards a target at a set speed, you can use Lerp or Slerp to rotate an object by a fixed amount over a set period of time.
This works by taking a start rotation, such as the object’s own rotation at the start of the movement, a target rotation, which is where you want the object to end up, and a time value.
The time value, when calculated as time elapsed divided by duration, defines where the object should be during the movement. So, for example, at the halfway point (when time elapsed divided by duration equals 0.5) the rotation will be in the middle between the start and target rotations.
Then, once the movement has finished and the time has elapsed, the object is snapped into its final rotation.
So when might you use this?
Quaternion Lerp and Slerp are useful for rotating an object to a new rotation over a fixed amount of time.
For example, rotating an object around 90 degrees taking half a second,
Like this:
Because the rotation movement has a start, an end, and is carried out over a number of frames, it works best when placed in a Coroutine.
You may have also noticed that, in this example, I used Quaternion Slerp, not Lerp.
While the two functions are easily interchangeable, as both accept the same parameters, there is a slight difference between the two methods.
The difference between Lerp and Slerp for Rotation
When interpolating rotation, you’ll have the option to interpolate linearly, using Lerp, or spherically using Slerp.
Most of the time you’ll notice very little difference between the two methods. The main difference is that the length of the directional vector remains constant during Slerp while Lerp, which is linear, can be more efficient to perform.

Lerp (green) vs Slerp (red)
So which should you use?
Generally speaking, using Slerp will produce a more accurate path of rotation, particularly when the difference between angles is large.
However… you may want to balance this against performance, as Lerp, which can be more efficient, will produce similar results in most cases and, for small angles, will barely be noticeable at all.
Quaternion Lerp and Slerp are best used for smoothly moving an object from one rotation to another.
However, like all of the previous examples in this guide, they work by setting the rotation of the object directly, basically emulating smooth movement with calculated values.
But what if you don’t want to directly set the orientation of the object?
What if, instead of rotating an object in a measured way, you actually want to spin it round with energy?
While rotation, just like movement, can be calculated and applied exactly, it’s also possible to apply rotation to a Rigidbody as a physical force.
Here’s how it works…
How to Rotate a Rigidbody with the mouse
Physics-based rotation, which is created using angular force and drag, can be a great way to create natural object rotation.
It works by applying an amount of force, which causes an object to rotate, after which angular drag slows the object down bringing it to a stop.
This can be used for all kinds of mechanics; Spinning an inventory object by clicking and dragging the mouse, for example.
So how can you use it?
How to use the Add Torque function
The Add Torque function adds an amount of rotational force to a Rigidbody, taking a Vector 3 value to define the direction of the rotation in world space:
So how can you use it?
Let’s say I want to create a floating object that can be spun around by clicking and dragging the mouse, similar to how you might view and rotate an item in a game.
For this to work, I’ll need to attach a Rigidbody to the object I want to spin.
In this example, I’ve disabled gravity and increased the object’s angular drag.
I’ve turned off the Rigidbody’s gravity so that the object doesn’t fall out of the air, and I’ve given the object 5 units of angular drag so that it will stop fairly quickly after being rotated.
Then, to rotate the object using the mouse, all I need to do is pass in the Horizontal and Vertical axes of the mouse input into the Add Torque function whenever the mouse button is down.
Like this:
When the mouse button is held down, I’m storing the directional movement values of the mouse in float variables and multiplying them by a strength value.
Then, in the Add Torque function, I’m applying the vertical mouse value to create rotational force around the X-Axis, while the horizontal mouse value creates force around the Y-Axis.
The end result is smooth, natural rotation, that’s applied when clicking and dragging the mouse.
The Add Torque function is great for moving Physics objects around naturally with the mouse.
You’ll notice that I’ve split the functionality of this script across both the Update and Fixed Update calls, connecting the two indirectly using variables.
This is because, while the physics-based Add Torque function should be in Fixed Update, so that the application of force is in sync with the physics steps of the game, the input checks, which are framerate dependent, need to be in Update to work properly.
Splitting the functions like this prevents the different frequencies of Update and Fixed Update from affecting each other.
How to Rotate objects in 2D
A lot of the techniques used for rotating objects in 3D in Unity also apply when rotating in 2D.
This is because, generally speaking, normal game objects in Unity are the same in both 2D and 3D, with the only difference being that the forward vector, Z, usually represents depth in 2D.
Because of this, in order to get the results you want, it helps to be mindful of which axis an object is being rotated around.
Luckily, however, most rotation functions in Unity allow you to specify which way is considered to be up, allowing you to change the orientation of the rotation if you need to.
Such as the Look At function which, in this example is set to face the player in 2D, with the forward axis set as up.
However, in some cases, when working with 2D objects, even changing the orientation of the rotation may not get you the results you want. In which case you may find it easier to simply rotate around the object’s Z-Axis using a single float value.
Which is, in fact, exactly how rotation works with 2D Rigidbody objects.
How to rotate a Rigidbody in 2D
While many objects rotate in similar ways in both 3D and 2D there are some specific differences when applying physics in 2D.
The 2D and 3D physics engines in Unity are separate. Which means that rotating a physics-based object in 2D can actually be much simpler than it is in 3D.
This is because true 2D rotation only occurs around a single axis. As a result, Rigidbody rotation is stored, and can be applied, using a single float value, which represents the amount of rotation in degrees clockwise or counter-clockwise.
Like this:
Now it’s your turn
Now I want to hear from you…
How have you dealt with rotation in Unity?
Have you found it easy, or has it given you constant headaches?
And what tips have you learned that you know others will find useful?
Whatever it is, let me know below by leaving a comment.

by John Leonard French
Game audio professional and a keen amateur developer.
Get Game Development Tips, Straight to Your inbox
Get helpful tips & tricks and master game development basics the easy way, with deep-dive tutorials and guides.
My favourite time-saving Unity assets
Rewired (the best input management system)
Rewired is an input management asset that extends Unity’s default input system, the Input Manager, adding much needed improvements and support for modern devices. Put simply, it’s much more advanced than the default Input Manager and more reliable than Unity’s new Input System. When I tested both systems, I found Rewired to be surprisingly easy to use and fully featured, so I can understand why everyone loves it.
DOTween Pro (should be built into Unity)
An asset so useful, it should already be built into Unity. Except it’s not. DOTween Pro is an animation and timing tool that allows you to animate anything in Unity. You can move, fade, scale, rotate without writing Coroutines or Lerp functions.
Easy Save (there’s no reason not to use it)
Easy Save makes managing game saves and file serialization extremely easy in Unity. So much so that, for the time it would take to build a save system, vs the cost of buying Easy Save, I don’t recommend making your own save system since Easy Save already exists.
Comments
Hey John,
thanks for this great comprehensive guide. This went immediately to my bookmarks 🙂 and will be shared.